This is myself cartooned. I took a photo of me in photo booth. Then, I put this photo in to Photoshop. I made a layer for the original picture, a layer for the outline and coloring, and a layer for the background. I outlined myself with a black 3 pixel brush. Next, I used the magic wand tool and I took clicked on certain sections to to create a contour. I contoured on the face, neck, and shirt. I used the eye dropper tool to match my skin color and shirt. For the background I created a graffiti look. I took some different colors and I made random lines. Lastly, I flattened my and saved it as a jpeg.
Thursday, September 29, 2016
Tuesday, September 27, 2016
Starry Pokemon Night
Introducing Starry Pokemon Night! I used six Pokemon that I like. Those Pokemon are (Right to Left) Torchic, Pikachu, Squirtle, Mew, Togepi, and Bulbasaur. I used got a picture of the original Starry Night and I enlarged. Then, I put this original painting into Photoshop, where I outlined it. I wanted to show a Poke gym instead of the black mountain in the original. Next, I colored the sky and smudged similar colors. Then, I placed the Pokemon in where the yellow stars were suppose to be. After, I put a Pokemon town from the tv shows to represent the village in the original. Lastly, I blended the sky and the village together and I deleted all the layers I did not need.
The Halle Scream Part 1 and Part 2
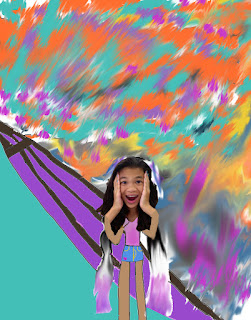
This is The Scream. I made this artwork my own by recreating The Scream as a girl. She has modern day clothing. I tried to make this recreation of the scream look like me, but at the same time keep the same shapes and details. I did change the background. First, I got the picture of the scream and I enlarged it. Then I put it in Photoshop and started outlining. I made a new layer for the tie-dye smudge background. For the background, I put bright happy colors and then used a special smudge tool to make lines in the smudging. Next, I colored the entire background and the girl. Lastly, I flattened the image...But I'm not finished yet.
Part 2 of the assignment was to put your head onto the scream painting. I used took a picture with photobooth, and no filter. I used the magnetic lasso and cut out my face. Then I put my face on a the same contour layer as the rest of my drawing. I used the eye dropper tool to then change the skin color to match better with my face. I also fixed the arms to make then more realistic. I flattened the image and saved the art as a jpeg. And now presenting The Halle Scream!
Part 2 of the assignment was to put your head onto the scream painting. I used took a picture with photobooth, and no filter. I used the magnetic lasso and cut out my face. Then I put my face on a the same contour layer as the rest of my drawing. I used the eye dropper tool to then change the skin color to match better with my face. I also fixed the arms to make then more realistic. I flattened the image and saved the art as a jpeg. And now presenting The Halle Scream!
Tuesday, September 13, 2016
Mona Lisa Project
I started my Mona Lisa art work by using the original Mona Lisa drawing and making it a very large image. Then, I put the original drawing into photoshop. I made another layer and started tracing the drawing with a black three pixel brush. Then, I colored the photo in using the magic wand tool, brushes, and smudge tool. I used the smudge tool to create a 3-D affect. The smudge tool came in handy to contour the outfit, neck, and checks. I deleted all my other backgrounds leaving the sunset and the contour drawing. Then, I used the flatten tool to push all the drawings together. Last, I touched up all the lines, made everything more detailed, and this is the final product.
Subscribe to:
Comments (Atom)


